 Post photos of your the progress on your Democratic chair, ask questions and make friends. For students in the Democratic chair series of online classes.
View photos students have posted on Instagram (no account required).
Post photos of your the progress on your Democratic chair, ask questions and make friends. For students in the Democratic chair series of online classes.
View photos students have posted on Instagram (no account required).
Best way to remove pencil lines? I figure I should get rid of these marks on the legs before assembling the undercarriage. Even though they are far from perfect, I’m a little nervous to get back in there with the draw knife and risk messing up the nice sharp “peaks” that I managed to creat and maintain on the bobbins. Thoughts?
From the discussion below, Mark Terry has not been able to post an image of his chair. I am going to attempt same for him. Well, so much for that!!!!!
Late to the party, and embarrassed by the lack of craftsmanship, but just wanted to show that I finally completed the project. Wish I had another set of riven lumber to try it again.
Mark, please attach an image!
bob
I tried, clicking the paper clip, then choosing a file, but no success! Tips?
There is a size limit.
If you want, you can send the image to me and I will see if I can post it for you.
rlmlsimmons@cox.net
I recently fixed the issue with photo uploads – sorry about that!
I want to thank Elia and Curtis for making it so easy, and enjoyable, for home bound hand tool woodworkers to learn new skills and processes. They have been truly innovative.
I realize it’s all optional, but I wonder if the group consensus has been to glue the mortice and tenon joints, or not? Especially, the non tapered ones?
On the tapered Mortise & Tenon joints I glue the wedge. I live in a very dry climate and I take an extra precaution on the blind M&T joints (spindles). I install a “Fox Wedge”. For the tenons on the stretchers, I make them a through tenon and then I add a cross pin. I use 3/16” brass rod for that purpose.
Bob;
So, for the blind M&T joints in the spindle deck, you make a slot in the tenon, insert a wedge in in it, then insert the tenon? Do you make any attempt to widen the deep end of the mortise before inserting, to accomodate the presence of the wedge?
The way I was taught, the growth rings of the tenon are oriented perpendicular to the long grain fibers of the wood with the mortise. The wedge also goes perpendicular to those long grain fibers. I use a small gouge to go into the mortise and scoop out on the two sides of the mortise where the tenons will deform.
I opted to glue all the joints except the spindles, reasoning that they are held in place by the glued posts and crest rail. I wedged the tops of the spindles, though, to make them fit tighter visually. I wedged the legs and posts as well. I’ve made six or seven chairs now, and when it comes time for painting and finishing I always wish I’d been more religious about glue clean up!!
What finish schedule do you intend to utilize? Are you happy with the way your Democratic Chair turned out?
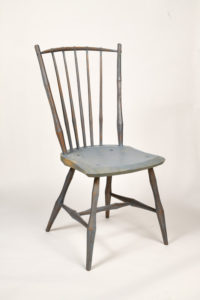
My Democratic Chair turned out OK, but not as well as I’d hoped. It certainly improved my drawknife, scorp and mortise and tenon skills, but will probably be my new “shop chair” 🙂 I made the legs too skinny, and they ended up short as a result. I am attaching a picture of how it stands now. I plan to use Sea Green milk paint, since I already have it, and want to see what it looks like. It’s darker than the vibe Curtis has settled on, and probably won’t look as nice, but as I said, it’s a shop chair now! As for finish, I have some Teak Oil, which I will use. If I had more time (I am about to move, and my shop is closing down for a while) I’d experiment with Shellac flakes. I used the BioShield #2 on prior chairs and it was too slow!
I do not think you can do anything to keep them from looking good. Once they are painted and a top coat applied the light plays off all the facets and edges and they just sparkle. I opted for black over red over yellow with plenty of red and yellow showing through. It sits at our dining table and gets lots of comments. Some of the comments are even positive.
Seeking advice as to the lesser of evils. I screwed up, and now one of my uprights has a more lateral splay than the other. If I put my spindles in the suggested location, there will be a bigger gap on one side between outside spindle and post, or if I spread out the two on one side, bigger gaps on one side than the other.
If I were to ovalize my mortice in the seat, maybe I could straighten the post up to match the other side, evenly spacing spindles, but resulting in a loose mortice, which I’d have to fill with wedges.
Anyone have experience or thoughts? Thanks
Mark, is the difference in splay, of the back posts, due to a difference in the angle of the mortises? Or, is there a bend in one of them? Most likely the mortise angle. Rather than changing the spindle spacing, I think I would plug the offending mortise and then re-drill it. Do you have spare stock?
Bob;
Thank you ever so much for your response.(Seems like you’re the only one monitoring this site!) You were spot on with your suggestion. I turned a plug for the hole, then redrilled and reamed. By the way, it’s a lot easier to set up guide lines before the seat is carved. With the proper angle, problem solved.My crest rail shortened about a couple inches. The spindles are all evenly spaced. It’s all good.
I am pleased that the proposed solution worked for you. Yes, laying out sight lines is, in fact, much easier before the seat has been carved. It is not that I monitor this site; rather that I am interested in how people are doing. The challenges they face and the solutions which they find. Maybe it is because I do not have the pressures of life, which frequently get in the way. Matching post angles and evenly spaced spindles are all a good thing.
I just took a look at my parts, which have been air drying a little over a week now, and discovered some cracks have appeared on two of the legs. Quite a bit up the side of one and a small end check at the bottom of another. Oh well… time to carve a few more I guess! Any advise on how to avoid this happening in the future?
Tom, they probably dried too rapidly. Where did you have them and where do you live? At this point, if you have the GreenWood stash, I would make a new.
You’re probably on to something there, Bob. Our winters here in Wisconsin and notoriously dry. I did keep the parts in my 42 degree basement in hopes of keeping the drying slow, but maybe that wasn’t enough. I do have extra green wood and I plan to make a few new legs tomorrow. I will say, however, that despite having been split from the same log as all the rest, the leg with significant cracks on it’s tangential section was for some reason noticeable darker in color on it’s tangential face with much greater contrast between it’s early and late wood. I feel like this might suggest that something having to do with the characteristics of that particular piece of wood might have been at play here, whereas the leg with the small end check may just have been a flunk.
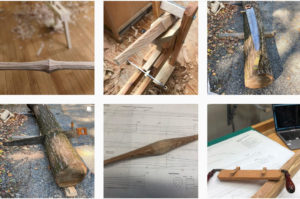
Here is a picture of my completed parts (pre cracks!) just for fun. I’m kind of bummed to be having to whittle a few new legs, but I’m also kind of looking forward to it, as I feel like I am now just finally getting the hang of it!
As a follow up to the cracking. In a pinch, when I have not had spare GreenWood to shave a new piece, I have stabilized the crack. I fill the crack with CA glue and clamp the crack shut. I have never been unsuccessful. However, IF I had a stash of GreenWood, I would always opt for shaving a new one.
I had enough green wood to make two new legs, but I still think I will do some crack fill so that I have an extra or two, for practice purposes on future steps. CA glue, eh? In passed woodworking experiences, I have repaired cracks/splits by using regular wood glue in a syringe to administer it deep into the crack, but I suppose CA glue might do a better job or wicking into the crack. I’ll have to try that.
David Fisher, the bowl carver who is doing the next webinar (tomorrow) with Elia has a recent entry on his blog about a beautiful Cherry bowl cracking during the drying phase. He describes how he saved the bowl with CA glue and a butterfly. https://davidffisher.com/blog/
Here is another attempt to show my bent crestrail, with more springback than I had hoped.
Mark, if you send me your crest rail image file, I will see if I can make it post. Rlmlsimmons@cox.net
I steamed my crest rail, clamped it to the form and left it there about a week. When I unclamped, there was “some” springback. It’s still curved. but doesn’t match the form. Should I be content, or is there any reason to resteam?
In preparation for carving tenons, should I superdry with foil in center to preserve moisture for eventual mortices?
I tried to post a picture of it, but not sure it worked.
Mark, I do not have any experience with re-steaming. I don’t have any advice in that area. Relative to the form, how far away are the ends of the crest rail? You speak of carving tenons. I assume you mean tenons on the crest rail. The tenons on the spindles are wedged into the crest rail mortise, so it is not really necessary to preserve the wet-dry relationship. So, I would follow your own suggestion, wrap in foil, leave the ends exposed and put the piece into the kiln.
Thanks Bob. I just tried again to post a picture. All of this may be a moot point, cause I’m not sure my crest rail would fit into my 4″ pvc steam box.
Right good day folks! I’m a bit of a newcomer to the chairmaking world, and have a question about radal and tangential planes. My logs are quite small in diameter, about 10 inches. If I rive the log into 4 quarters, and make a leg from each section, the growth rings turn 90 degrees (give or take) through each section. Surely this means I end up with two radial planes next to each other, rather than opposite, and like wise for the tangential planes?
Does this make any sense to anyone, and if so, is it an issue?
Cheers,
Fred
Fred, after rivings out a piece, the focus on Radial vs Tangential is based on ease of initial shaving to form a square blank. The Radial plane is easier. Once you have a square blank, and have eliminated the juvenile pith, then you will take the stock octagonal. Have a great time. Make nice shavings, and post pictures. Enjoy the adventure!
So, Like Bob said, you will need to remove the pith and a few rings of Juvenile wood. If you do that to a square piece like the one on the right in your diagram, you’ll end up creating a new face (blue) that is 45 degrees to all the others. Then, if you re-square up the stock referencing off that new face, you’ll end up with a blank (red) that has it’s radial and tangential faces opposite each other. It seems to me that if you started with a 10″ diameter log, you’d still have plenty of room to lay out a chair part, even after squaring the piece up in this new orientation, No? I’m new at this myself, so I hope someone calls me out if this is a dumb way to go about it!
Many thanks to both – that makes sense! The log is actually about 8 inch diameter, which makes it quite tight but I’ve gotten 4 legs and a couple of stretcher parts out of it so far. A few failed attempts but learning a lot!
Good looking parts. Thanks for making the image available.
You could do it that way, but you might get better yields by cleaning the two sides farthest from the pith (the two adjacent sides that we can see in the drawing) and making them your reference surfaces. Mark from them with the marking gauge set to your part’s major diameter and proceed as normal. Since the part is going to be octagonal when it is done, you’ll remove just as much if not more of the juvenile wood and maximize the yield from the part at the same time.
Thanks all. Makes sense!
Finally found some wood for the seat – english oak. Hard as nails!
Fred, you better have sharp tools and strong wrists!!!
So it’s looking like very soon I am going to need pull the trigger on one of the intimidating larger purchases “required” for this project and buy myself a scorp. It’s seems to me that my best options are the 4” models by either Barr or Ray Iles. I’m leaning towards the Ray Iles because of the price and the fact that having the bevel down just seems to make sense to me. Does anyone feel the need to stop me and steer me in a different direction before I spring for it?
I have no personal experience with the Ray Iles, but, what I have read is that the angle of the handles will need to be adjusted. Apparently Elia has some experience with this.
Do you have a Barr scorp, Bob? Does that one really come ground with the bevel on the inside? What is that like in use? I have no experience hollowing seats, but based on my experiences with using edge tools in other woodworking applications, it just seems to me that a bevel on the OUTSIDE would be necessary for carving out a hollow.
Yes, Tom, I use a Barr and yes it has a bevel on the inside. I have found it very effective on shaping seats. Barr has a video on how to sharpen their tool. Having said that; Curtis uses a Barr that he has ground with a bevel on the outside. He has a YouTube video showing how he does it. I have not arrived at the point where I want to try that.
Tom, what coarse of action have you selected? You could write Elia a note and ask him for his opinion.
I think I’m going to go with the Ray Iles.
Please, after you have used it, leave comments on how you found it!
It certainly won’t be an expert opinion, but will do!
Crest bent! Señor Steam Box had to wrap up in some towels and put on his Mexican poncho in order to get over 200 degrees in my cold basement, but that sure beat trying to steam in the -1 degree Wisconsin outdoors today. You can relate. Right, Bob Simmons? 😉
HI guys, Does anyone live in the NYC area who wants to come pick up some really nice red oak logs? Two ten foot lengths about 14″ diameter available. I live in Rye, NY. and this wood is excess to what I need so I would rather it go to greenwood chairmaking than firewood if possible.
What an offer! I hope somebody SNAPS it up! Unfortunately, for me, AZ is not even close..
Hey. Me again. The plans state that length of the stretchers is adjusted to fit the actual chair later on in the process. Is that accommodated for in the way the stretches are drawn in the plans, or should I cautiously leave them a little longer then they are shown? Thank you!
Be cautious, and leave them long. You will cut them to length and do the final tenon shaping after the legs are fit into the seat and the mortises drilled for the side stretchers.
Tom, this blog is for success as well as questions. Be sure to post pictures when you are shaving and after you have some parts drying. Make shavings, not dust.
Noted. It took four attempts to get two side stretchers that I’d be willing to put in a chair, but here they are! I hope I’m now all warmed up to tackle some more complicated parts next!
The side stretchers look really good! How did that Red Oak log split? How does it shave? Is the wood still fairly wet?
It is very wet and shaves well, which I am pleased about. It a;so seemed to split well, although that is something I need to lean to do better in order to use the log more effectively with less waste. Speaking of waste… it became clear right away that I was going to screw up a lot of pieces, so I brought home another similar size chunk of the same stuff for peace of mind! 🙂
Do you deliver? I live in AZ! I make killer Mexican Food!
🙂 No, but I’d be happy to mail you a 200lb piece of Red Oak. You’ll just have to cover the cost of shipping! So what DO you use for chair making in AZ??
It is pretty simple, really. I either drive somewhere, take a class and buy extra parts, pay to have greenwood shipped, or alter processes and make the chair out of dried wood. In the case of the Democratic Chair, I bought the wood from Elia and Seth, stored it in a home-built humidifier to keep it wet, and then altered the assembly to account for both mortises and tenons being bone dry by the time I was ready to assemble. I have been making chairs since 2007 and have done “all of the above”. Travel to CA, OR, VA, KY, TN, two different places in NC. In this chair, I ruined one of the stretchers and had Seth send me three extra rivings. The rivings are cheap, at $7 each. By the time they got to my house, still nice and wet, I had spent over $50. But a guy does what he has to do to pursue a passion.
You need to find a class using saguaro for chairs. Thanks for the thoughts about replacement rivings. After looking at my drawknife work, I think I need a complete set.
Found a Red Oak log that I hope to use to get this project rolling! I’m not sure how fresh it is and the end checking that has begun has me a little worried (any thoughts on this?). Regardless, I’m looking forward to splitting into it this weekend and seeing what I find.
Good for you. It appears that there are regions where the growth rings are not concentric. Splits from those regions might not have straight grain. But it looks like there will be sufficient wood for a chair and spare parts, if needed. Once you split it, it will begin to dry, so take steps to mitigate the rate. It appears that the two major checks converge, as expected, towards the center. I think I would try to split out that smaller section first. And then see how that piece splits, by trying to split out halves.
It looks like there’s good wood in there, best I can tell from a photo. Those cracks exist in all good logs, just follow them when you split it in half.
I just split it open. It looks like there is a fair bit of beautifully wet, straight grained wood in there! I look forward to carving a few parts this afternoon.
Hello! I’m about to embark on the Democratic Chair adventure. At least, as soon as I find a suitable log to start splitting parts out of, that is. That shouldn’t be that hard as I work as an arborist! The trouble is, I’m not exactly sure what I am looking for. I’d love to use red oak, but I could be waiting a while to come across suitable red oak, as we don’t remove them all that commonly and pruning them rarely produces sizable enough material. (Speaking of size, is there an ideal log diameter I’m looking for?) Can anyone point me in the right direction by suggesting a few tree species common to the Midwestern United States that feature wood characteristics suitable to this chair? My apologies if this has been discussed elsewhere and I missed it.
Thanks!
Tom
Tom, in terms of diameter, there are two criteria that I know of. Don’t use the juvenile pith wood, and don’t include sapwood and heartwood in the same piece of the chair. Obviously, if you do not intend to paint the chair, use the same type of wood for all similar chair parts. In terms of wood species, IF you intend to achieve the small diameters indicated on the plans, then I think you should restrict your selection to Red Oak, White Oak, Hickory or Ash. The only seat materials I have experience are Eastern White Pine, Elm and Hickory. Both of the latter options are a real challenge to carve.
Thanks for the helpful info Bob! I’m glad to hear you confirm that Ash would be an okay choice. I’ve been thinking that that’s probably what I would end up using. Emerald Ash Bore is absolutely decimating it around here so I figured I might as well put some of it to good use!
Out of curiosity, how do the wood characteristics of Red Oak differ from White Oak?
-Tom-
Tom, for my information, IF an Ash tree is harvested because of the Emerald Ash Borer, is the tree dead. If so, how long has it been dead? Is the wood dry or still green? In my opinion, Green White Oak is much easier to shave than Red Oak. And it certainly bends with fewer failures. The bend in the Democratic Chair is fairly mild, so either work and I am sure Green Ash will also.
Good Question Bob. It really depends. Sometimes trees that have been killed by E.B.D. are stone dead when they come down, but often they are removed only because they are in severe decline and, despite being unhealthy, are still actually living and green. This has me curious though, I would imagine that even a dead standing tree can retain it’s moisture for quite some time. I wonder how long a dead tree can stand and still be a viable candidate for green woodwork. Hmmm…
Working on finishing off the Milk Paint, before top coat application, and I was reminded of a learning I think is worth sharing. IF you rub down the Milk Paint with steel wool, WEAR a MASK. IF it gets into your nose (mine) and mouth (mine) then it might make it to your lungs!!!!
I’m late to this party, struggling to get through the drawknife work with my limited skills. I’m working on spindles now, and notice that several of my spindle blanks are curved. Any thoughts about straightening in the steam box? Before or after whittling?
Mark, have you managed to keep the blanks “GreenWood” or, have they dried out? It is pretty common for spindles to have a curve. But, they remain pretty flexible and still bridge the gap between the spindle deck and crest rail. The installation strategy is to mount them in the spindle deck so they curve back and they look and feel nice. When you shave them, do not be tempted to shave them straight. That would cut across long grain fibers. Just shave with the grain.
Sorry for being so rude! Welcome to the party!
Rude? I didn’t notice. I used Elia’s advice, and submerged the pieces under water, with a bit of chlorine to prevent mold. They’re still “green.” Thanks for your thoughts.
Did I ever SCREW UP! I have been building a Continuous Arm Windsor in parallel with The Democratic Chair. The seat blank for this Windsor, is a piece of Eastern White Pine, which has been stored in my low humidity, hot, garage for several years. When it came time to paint the chair, I did not even consider using Extra-Bond adhesion additive to the first coat of Barn Red Milk Paint. BAD Decision. There are large regions where paint just will not adhere. I ended up scraping the seat and then applying a new “first-coat” with Extra-Bond mixed in like I should have initially. As I have told myself multiple times, it is time to develop ma checklist.
Hi All – A bit confused as to what is being done with the hand plane during the carving of the seat. Is he tapering that section over the edge from front to back so that inside line along the seat con cavity is higher than the outside edge? And what’s happening to that front corner Curtis says to bring down to 3/16th? Can someone post a couple pictures of what the sides and that corner are supposed to look like? The camera doesn’t really show what’s happening. Looks to me like he just made to flat and I know that’s not the case. Thanks again!
David, if you send me an email, so I have your address, I will send you some images that you can really zoom in on. Do you have the seat counter from the plans? Bob. Rlmlsimmons@cox.net
After rubbing out the Milk Paint I applied the first top coat. A great design and plenty of learnings.
If you have not used a thin Milk Paint “Wash Coat”, do not be put off by initial appearance. They look like crap until they are rubbed out. I will post finished product later.
Merry Christmas All – I’m hoping to bore and ream holes on Tuesday with an acquaintance that is a chair maker. It’s a 2 hour drive . I may have missed the video section on prepping the legs and posts before boring/reaming. Do I need to super dry those first before rounding the tenons and reaming? If so, for how long prior to rounding? And how do I keep them super dry for the 2 hour car ride? Thanks! – David
David, the tenons on legs and posts should be bone dry before you do the final shaping and then ream the mortises to match. I would dry the tenon ends for 24-48 hours and then wrap the tenons is cling wrap for the drive. Good luck. Keep us posted.. Include pictures.
David, did you successfully shape tenons and bore and taper ream you seat?
Happy New Years Bob and All – Thanks for asking. Yes and no. Yes, the boring and reaming went well and I was pretty much hitting my angle targets with the first initial twists after I got to holes number 5 and 6. Took much of the day though to get to that point. And no….my tenons are too small. I didn’t leave enough meat on the octagons to be able to really bring them down to round. So they’re going to have to sit in the mortises as octagons. I realize that’s problematic but it is what it is. I’m going to stuff some glue and sawdust in there to hopefully help shore things up. Chair may not last 300 years, but maybe it will be a nice conversation piece for the next 20-30. LOL!
Be sure to post an image when you are done!
A minor setback. Driving wedges for the Posts produced a split in the seat. Si, I will install a butterfly before painting.
All that remains is drilling the 5 spindle mortises in the crest rail. For that, I will wait for a spotter to guide my drilling. What a great project, learning, and class this has been.
Nice work Bob. inspiration for us!
Thanks. It was a great project. I really improved my tool skills.
I really appreciated, and enjoyed, the basic premise of the Democratic Chair Class. Make a really nice looking chair, with a minimum of tools, and improve hand tool skill in the process. After trying to dome tenons with a drawknife, twice, I decided I needed to try another approach. In keeping with the concept: “If you have the tool, then use it”; I followed Dan Hawley’s lead and used my spoon carving hook knife. It really worked slick!
The replacement stretcher was ready to finally shape and install. The image shows me drilling the mortise for the medial stretcher. Gotta love that auger bit extension.
Oh, what a day! I am waiting for a replacement stretcher to dry in the kiln. So, I started playing around with Milk Paint on some White Pine and Red Oak off-cuts. I have finished chairs before, bit never with all these facets and crisp edges. What a great look!
Here is an image
During the Milk Paint session, on Saturday, Curtis mentioned a new color combination he really likes. I believe he said he used it on the Child’s Continuous Arm Rocker displayed on his web site. I have attempted to replay the session, but it just stalls. Does anybody know what colors Curtis described using on that little rocker?
I heard back from Curtis. The Milk Paint scheme for that child’s rocker is 3-coats of Barn Red and 1-coat of very dilute (4-parts water to 1-part paint) Black. The resulting “Bronze” look is, in my opinion, stunning.
Hello All, I want to take this opportunity to thank Curtis and Elia (and all the support team) for an absolutely splendid session. As Elia was demonstrating staining and then painting his sample leg and rung, it became apparent how great all the octagonal facets, and crisp edges, look in the finished product. A superb journey!
Well Folks….obviously I’m making this harder than I should be. Previously I asked about tapered auger bit extenders. Well, I actually have hex shanks instead. My 5/8 bit has 25/64 shank (I assume this can be considered 3/8) and I also have 5/16 shanks. I’m looking at extenders that have set screws in the female socket. How do I know if they will hold any specific size shank? Will smaller shanks be offset and thus offsetting the bit? They only list the extenders shank size, not the female socket size. And….Is an extender only necessary for the legs and stretchers? Which means I only need one that fits a 25/64 hex? Am I making sense and for those that have hex shanked bits, what are you using. Thanks.
David, your assessment is correct. IF you put a 5/16” shank into a 3/8” socket, you might be able to get the set screws to hold it in place. But, the centerline of the two shafts would not line-up. I don’t think you would get a good mortise drilled. I use bit extenders for drilling the undercarriage mortises (legs and stretchers) and for drilling the mortises in the spindle deck.
What’s the difference between a bit extenders and the auger extension, Bob? You mean just a longer version of probably the small bit extenders we all have in our tool box for the various choices of Phillips, flat, hex screw driver bits?
You mentioned, above, that your auger bits have hex-drive shafts. I use the more classic design auger bits with the square-taper drive designed for the older style bit-brace. The one I use was made by Millers Falls back in the early 1900s, I believe. It is 18” long. Elia has shown how they are used in the videos.
here’s a dumb solution — get a cheap mechanics deep socket that is the correct size for the hex bit to fit tightly into. if you can’t find the perfect size, then you can wrap the end of the hex shank with electrical tape until it fits tightly. if you are the fancy type and have a cheap socket, then you can drill and tap a set screw into the side of the socket to hold the bit.
Then grind off the female end of a long socket extension bar so that it can fit into your brace.
I don’t think the assembly will be grossly off center — at least for these purposes.
You can get this together for less than $30 from either a discount tool seller or online.
Hey Bob. Did you say you had a extension that would fit the jenning bits
Jay, the auger bit extension is not specific to Jennings or Irwin pattern bits. It accepts any bit with the standard, square-taper, fitting for chucking up in a bit brace.
Happy Monday All – I’m way behind and just finishing my second set of spindles. But getting prepped to start the seat over the holidays. Question………want to get an auger bit extender. I bought the augers from Lee-Valley but not sure I see the correct extender. The bits have a tapered shank. I then tried Highlandwoodworking, but they say they’ve never seen one for a tapered shank. Anyone know where I can get one? Thanks!
Hi David,. I bought mine on eBay. The one I bought was a vintage North Brothers number 2150 Yankee auger bit extension. It cost $18.
I bought mine on eBay. It is a vintage Millers Falls #11. I paid $18.
mine cost $12.50 from Ebay — it was 15″ North Brothers one though so maybe i will regret the shorter length.
Have a recommendation for Elia’s spindle that end that partially broke off. In California we have a beautiful granite formation called half dome. He could fashion it after that.
Good idea! I took one, put it in photoshop and scaled it to.0000000105%. It fit perfectly.
Sweet!!
Had a problem assembling the chair back that I thought I should share. The crest rail needed to go farther down the spindles than I estimated. I hammered on the crest rail to get it down far enough to seat the posts. Problem: once I start hammering I stop thinking. I should have stopped and thinned the spindles more. Instead I banged away and cracked the crest rail. I’m making a new one now. I plan to fit the next one without the posts and make sure it can go down about an inch farther than I expect. P.s. the spindles are in the seat for good now. Couldn’t get them out if my life depended on it.
That is the beauty, and curse, of dry-and-not-so-dry joinery. Can you still thin the spindles in-situ?
Yes, I should be able to use a spokeshave.
Hi I’ve ben posting on istant gram but I thought I’d come by and say hi here too…
Karl
Welcome to the group. We have been having a great time building chairs and swapping tales.
If you are looking for an alternative to the scorp for doming the leg tenons, try using a hook knife with a long handle, if you have one. I use mine for carving spoon bowls. It was much safer and infinitely more effective than the scorp. You can see the tool and the results in the attached photo.
What is the advantage of the long handle? Does the increase in leverage come with a decrease in control?
Hi Bob,. I think the increased leverage provides more control because you can make minor adjustments without straining. It was a pleasure to use the hook knife after the scorp. The hook knife gives more control with less risk of gouging the seat – which I did twice – or my leg – which I almost did once. Plus I could finish a dome in about 2 minutes.
Hope all had and are having a Happy Thanksgiving! No class this weekend,correct? Next one in Dec.?
Correct! Dec 5th and Dec 12 are our next (and probably final) classes. Happy Thanksgiving to you too! Elia
From my perspective, these sessions have been a huge success. I can only hope that the Curtis & Elia show will have a sequel.
I went looking for a 5/15 chainsaw file to enlarge the opening on my 5/16 dowel plate but could only find packs of 6, which were many more than I will need and about $22-$25. Then I found some “5/16″ Burr Grinding Stone File” (diamond coated) for about $7.50. With one I was able to enlarge the hole in my 5/16 dowel plate (smoothing with high grit sandpaper) to match my #5 auger bit.
At least I think I have the fit right. The spindle tenon is snug and won’t fall out but can be pushed in by hand with moderate pressure. Anyone know if that’s the right fit?
Brian, I assume that you are fitting bone-dry tenons into a test mortise of some sort; and that the tenons will be going into a crest. My experience with Continuous Arm and Sack-Back Windsors is that I started with the test fit you describe, and then, because I was aligning 9 long spindles into a curved bow; I needed to loosen those tenons a little. I can only assume that there were small mis-alignments within the collection which contributed to increased friction. I would use the fit you describe to size them all, and then scrape the tenons a little, if need be, during assembly.
Thanks, Bob, that’s the situation precisely. I figure I can always take a bit more material off a spindle if needed. If doing so becomes a chronic issue then I’ll go back and enlarge the hole in the plate a bit more. I can make the hole larger, but can’t make it smaller…
It sounds like you have the right fit.
Thanks, Elia!
After seeing Elia craft a dome on the end of a leg tenon, I decided I needed practice. I mounted a Red Oak tenon into a White Pine off-cut and commenced to shape. I produced a decent domed tenon, but the ring around it, in the seat, clearly indicates I need practice keeping the tool from contacting the seat.
What a great session on assembling the undercarriage. The method for drilling leg mortises and stretcher mortises is new for me. It is a much better method than I have previously used. Thanks again to Elia, Curtis and all the support staff.
When you are taking a live class, and hit the point where you say: “Is this right”; you can go ask the instructor what it was that he said/meant. With the webinar, there is the recording. I was about to begin carving the front of the seat, and something just did not fell right. So, I stopped and went back to the video recording. I am glad I did as I was about to make an error! Watch it once for flavor and watch it again for details! Thanks to the Curtis and Elia show for making the video available.
I second that.
I am taking a little side journey today for a virtual presentation from The John C Campbell Folk School in Brasstown, NC. Lyle Wheeler, resident artist in woodworking, is presenting about chair making at the school. If you do not know about the Folk School, it is like summer camp for adults.
The presentation was about making a 3-slat ladderback chair; but, the splitting, riving, and drawknife work were all related to what we are doing. And, Lyle has an awesome shaving horse.
Alert! Do not make the mistake I just made. I drilled the seat mortises for the legs and had not put the sighting lines on the bottom of the seat. The error is recoverable, but it is much simpler to layout both the top and bottom before you begin. It is really difficult to ream the mortises without sighting lines. This is a good place to share both successes and challenges.
locate your sight line points on the bottom centerline and draw directly through the center of the holes, or as close as you can get… because the angled hole is directly in line with the site line. it will be correct. it’s what I did..
Thanks. Like I said, it is a recoverable error. But, I should know better.
After viewing Elia carving the seat, yesterday; I found myself wondering: “If I get a set of leather suspenders and a red hat, will my drawknife skills improve?” For years I have been one of those blokes who reached for the spokeshave or travisher too soon. But, I al learning to stick with the coarse tool longer.
Pretty sure it’s not the suspenders, or the hat. But if it works let me know!
Thoughts or knowledge on why my bobbins are squarish?
David, I assume, from what you are asking, that when you completed shaping the bobbins, they were fairly uniform octagons and now they do not look so. It is because they are drying and shrinking and wood shrinks differently in the tangential plane than it does in the radial plane. I am sure that Elia or Curtis will address how to true them up during final assembly.
Good Morning All – Remind me bc I’m a bit slow …. how long does the crest stay in the bending form before being removed and just set off to the side? And …anyone else in the Houston/Galveston area? Thanks.
Hopefully Elia will chime in. But, Dave, here is my read. It needs to be dry. Did you put the crest, and bending frame, into a kiln? I would leave it in the frame until it is ready to be used, then super dry it before the tenons are inserted into the posts. I bend slats for ladderback Post&Rung chairs and then transfer then to a drying form. When they are dry, and set, they are loose in the form, no longer under compression.
Thanks Bob. I bent and put it in the form on Saturday and have left it there. I noticed last night that the C clamps were a bit loose so I gave them a little twist. So it’s still just clamped up. The “drying form”…is that different than the bending form, and if so, what is it and how is it different?
I don’t know about drying forms for the crest. When I bend legs and slats, I use a very sturdy bending form and then transfer the piece(s) to a second form to hold the shape and free up the bending form to use for the next piece. For the crest, I left mine in the form for 2 weeks; but it is very dry where I live so the crest had set by then. I would just leave the crest in the form to minimize the chance of spring back.
Perfect! Thanks Bob.
On the subject of winding sticks. As Elia fit the posts into the seat, last Saturday, Curtis prompted the use of winding sticks to help assure that the two posts were in matching, symmetrical, angles. Elia used two convenient straight edges. Some woodworkers take the time to make a pair of matching wood strips. I prefer to use two pieces of commercial 3/4” angle. The angle allows the strip to support itself on the ends of the posts or legs. I also spray paint the lower strip so there is a easy to read color distinction.
Sorry, I failed to mention that it is lightweight aluminum angle.
Same approach I use. I picked it up from Curtis’s videos.
On the topic of marking wet wood. I tried several different pens pencils and markers and was having a difficult time seeing my marks until I tried my Pica marking pen (it’s a pencil but it’s labeled as a pen?) https://www.woodcraft.com/products/pica-dry-longlife-automatic-pen This thing works awesome on wet wood and it can still be erased with a normal pencil eraser. It’s awesome.
Cody, thanks for the info on this pencil/pen. Mine arrived yesterday, and I am impressed. IF it marks as well on GreenWood as it does dry; it will be an asset to my collection.
Elia, the quality of the recordings seems to improve every week. They look great!