Post photos of your the progress on your Velda’s chair, ask questions and make friends. For students in the Velda’s chair series of online classes.
 View photos students have posted to Instagram at #eliacurtisvelda (no account required).
Post photos of your the progress on your Velda’s chair, ask questions and make friends. For students in the Velda’s chair series of online classes.
View photos students have posted to Instagram at #eliacurtisvelda (no account required).
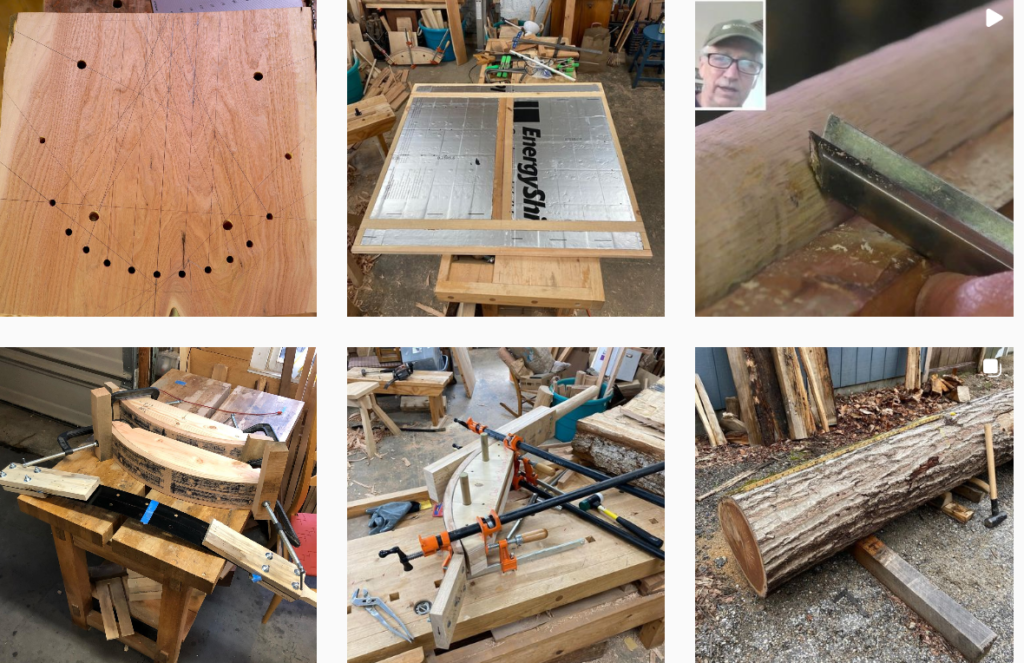
I have been putting off the drilling spindle mortises in the crest because I was intimidated by the prospect. This morning, I got my head on straight, and decided to go for it. After drilling the center mortise square to the chair, drilling the others along the sight lines identified by each spindle was a piece of cake. Then I put posts, spindles and crests into the chair for a dry fit.
So, I’m pretty far behind in completing the rocker. One thing that has bedeviled me is boring mortises, so I’ve been putting off as I got caught up on other parts of the chair. Last night, I started boring the spindles in the butternut I’m using for the seat. Challenging to get things consistently on the angle, as well as in line with the square. Plus some tearing as the auger bit entered the wood. Driven to make this better, I finished the drilling guide designed by Peter Galbert, ground a 1/2″ twist bit into a brad bit, put the drill extension together, and began again. Incredible difference! Easy, simple, accurate, and quick. Drilled the remaining spindle mortises, then holes for the arm supports and posts. Done. I am elated! I know that using a brace and bit is a time-honored, well-proven method, but I am not going back to it (and my elbows are grateful). So very much more straightforward with the guide. Peter has described it in his IG feed, plus on his blog. He shows it as well through his Foundations of Chairmaking series of teaching videos on Vimeo. Free plans for the guide are available there, too. Pics are attached. Info on bit grinding is in his book.
The very first Windsor chair class I took, in 2009, the instructors used a hinged wooden platform on a drill press. They had angle shims for the front and rear legs and the posts. So we just lined up the sight line and made the drill. It was an efficient process when trying to get 10 chairmaker s through the step. But, since then I have used the brace&bit with square and bevel gauge method. We all have to find a method that appeals to us and lets us do the work to the standard we want.
Like Herb, I too like the recorded format because I find myself scratching my head and barely keeping up at times. Having the luxury of going back over what was demonstrated has helped a lot. I liked that little drilling guide that was used both for the stretchers and the arm mortises. Realized that I had everything to make one. A nice add-on. A 6º taper from 1/2″ to about 7/8″. 1/2″ dowel that rides in a 5″ hole, fixed with a set screw. The dowel is hollowed out to support the 1/2″ drill extension I use. Ash from the offcut pile.
Nice idea. Thanks for making your creativity available to the group.
I do not regret the live classes I have taken with Curtis and Elia, but I really like the zoom/video approach. I watch the session once to get the overview and then view it again for details and I take pictures of tricky moves.
After todays class on carving and fitting the arm, I wanted to test how to drill the two step hole in the post. I found that drilling the 5/8 hole with a brad point, followed by a 3/8 Kreg’s bit to center in the lead hole of the first bit (but don’t go all the way through) followed by a brad point 3/8 bit with the clutch method of stopping the exit, then return with the 3/8 Kreg’s bit. Some tape on the exit hole helped too.
I have had to delay assembling the legs to my chair. While shaping the last rung, the tenon snapped off. So, back to a GreenWood spare blank and making a new rung. It took 8 days for the rung to dry. To avoid cracking, in my super-dry locale, I only leave the rung in the air for 8 hours and then put it back into plastic until the next day. But, this morning all was “go” and I have installed the rear and front rungs. Drilling went very well. Tomorrow, I will do the two side rungs. In the image, you will observe that I used a two piece seat blank, and installed cross grain butterflies to secure the glue joint. I am super conservative.
So much for being conservative, while assembling the side stretchers into the legs, I cracked a tenon. Progress is on hold while I shave a new one from my last piece of GreenWood.
Bob Simmons asked for photos of the seat scraper I used in class #4 – here you go!
Very nice! The images have my brain ticking! Thanks for posting them. Bob
Elia, do you find the long handles useful, or do you grip the tool down close to the main body? Bob
Shorter handles would be fine, I think.
My Walnut Seat is coming together. I’m using air dried stock and glued up 2 pieces to fill the required distance. I did the grain across the seat and I can’t even tell where I glued it up. The tool work was easy and a joy to use especially the travisher. I went front to back across the grain to work. I think being air dried was the reason why the walnut was easy to carve.
William, can you post an image?
Here you go
There’s a 3mb limit and I had Live Photo turned on
That is a really nice looking seat! What finish do you intend to use???
I’m going to use tried and true oil varnish
Here’s the finish I use
Bill, I use an oil-varnish as my go-to-finish but have not tried “Tried & True”. I will have to give it a go on my next oiled project. Thanks.
Beuatiful grain! That is really lovely, William. What wood are you using for the other parts?
In using all walnut except for the spindles which are white oak sapwood
As fellow chairmaker, Dan Hawley, said: I have eliminated a weakness in one of my parts for Velda’s Chair. I was doing final tenon sizing on the stretchers with spokeshave and test block. And, SNAP. I have a spare piece of GreenWood from the same shipment, so I will shape it today. Life is an Adventure. Life might have roadblocks. But, Life Is Good.
I finally bent my crest this weekend, but I wasn’t able to keep the ends flush with the form. No matter how many clamps I put on it, once I started bending, it pulled off the form on each end about 1/4 inch. Did anyone else have this issue? Hopefully it will still work.
Hi, Peter – I had the same result. I wrote Elia and Curtis about it and they both said not to worry about it. So I won’t. Apparently, you shouldn’t either.
Regards
Great, thank you!
Peter, I had a similar result. IF, after I mount the posts into the seat, the crest does not quite fit, I am going to try to boil just the ends and attempt a re-bend of those regions.
mine did not either Peter, the main curve looks good so will see once the layout is complete.
Today, Saturday 22 May, I began carving the seat for Velda’s Chair. After not too many strokes with my Barr Inshave/Scorp; I realized that I made a tactical error. I purchased seat blanks from Elia and knew, in advance, that he only had 2-piece seats available. I ordered two sets, and glued up one. Layed out the mortises, drilled and reamed as appropriate. Instead of putting the glue joint town the chair seat center, I should have split one of the pieces and put glue joints closer to the sides. The existing joint is making it difficult to do a good seat scooping task.
IF you were not paying attention during the reaming lesson: Don’t forget to reset your sliding bevel gauge between front legs and rear legs and arm supports and posts. Every lesson is filled with learnings which either (or both) Elia or Curtis has made. Experiential Learning passed on by the Pro’s.
Every time I make a chair, I get to the point of shaping the tenon for the top end of the spindle, and I think: “Wait, that can’t be right. They are too skinny. They will certainly break.” But, they never have.
FREE SAMPLE PARTS: To the first responder who is making a rocker, I will ship one rocker leg (with a crack) and the whittled arm stump I made during class last Saturday.
Hi Elia, if no one has responded yet, I would love to have a sample rocker leg and arm support. Thanks, Dan
They are yours! What’s your address?
It is time to drill some holes in the spindle deck. Here is hoping that my crest comb bend matches the angles for spindles and posts on the plans.
When Elia demonstrated spindle bending for Velda’s chair, he did an over bend to increase the plastic deformation and reduce the elastic spring back. I doubt that this spindle will have any spring back.
When shaving, I size tenons using a washer. Fit the end, and then slowly adjust and keep moving the washer towards the center.
I am in the process of shaving stretchers. My first is the short, rear, stretcher. I have a spare long stretcher, so I figured I could replace the short one IF I messed it up.
Does anybody know what to do about orange mold on the Red Oak chair parts? It shaves off, but does the mold have roots down into the wood?
Hi, Bob – I have not seen that on any of the red oak I’ve used. My understanding of fungal growth is that they do grow tendrils into the material. Typically, you won’t see this, but a good example of fungal growth within a piece of wood is spalting. I would think that if it’s on one of the chair components that’s going into the kiln for a few days, it won’t be a problem, as the heat would possibly kill it off. Is it visible on all your wood?
Dwight, thanks. Not all the parts. I am going to watch things closely. Elia suggested a mold spray.
I just made my first bend with this contraption that looks like its from the Spanish Inquisition.
Herbert, what wood are you using for the chair crest? Did the bend go smoothly?
Hey Bob, I’m using white oak that I got from Elia and Seth. I haven’t taken it out of the form yet, but it looks like it went well.
How long do you intend to leave it in the form as it dries?
I guess I’ll give it a few days, sneak a peak, then put it back in the form for a few weeks.
I like the bending contraption you made. I’ve been looking at winches and rope. Too many to choose from. What is the rating for the winch? What kind of rope did you use? Thanks, Paul
I got these items from Harbor Freight. $30 for the winch and $11 for the rope. Probably overkill but, who knows.
HAUL-MASTER3/8 In. X 100 Ft. Diamond Braid RopeThis durable diamond braid rope is built tough to pull and secure loads to 600 lb.. The rope is woven with tough, 100% polyester strands and built to resist rot, mildew, oil and gas.
HAUL-MASTER1 Ton Capacity Hand WinchThe 2000 lb. capacity worm gear hand winch is easy-to-mount and ideal for mobile use on pickup trucks and trailers. The worm gear winch features steel towing cable and a smooth-action worm gear drive to keep a firm hold on items in tow.
Good luck,
Herb
Thanks Herb. That was quick.
Hi Herbert, could you email me a few photos of this crest bend contraption?
Williameboylejr@yahoo.com
The strap
I (over)built a compression strap similar to the one Elia used in class. Used wood that I had on hand (white oak cutoffs & ash from another project). I bought 16 ga stainless steel (5 by 48) from a local fabricator for $25. Drilled, then bolted together with carriage bolts. Building the forms for the crest and spindles next. Might actually get started on the chair soon…
Well, Dwight, that strap should do the job! I assume that you have three able bodied teenagers lined up to help you make the bend. Your workbench certainly looks stout enough to not move around the shop when you do the bend!
After much meddling with WordPress settings, I have gotten the photo upload to work again. Post away!
If you are looking for a source for sheet metal for a bending jig, I obtained this reference from Jeff Lefkowitz, a chairmaker in VA. You can order any size of multiple gauges. http://Www.cut2sizemetals.com
I did the same this Bob. After checking on the price plus shipping I took Jeff’s advice and looked form something near me. I was pleasantly surprised to learn of a new resource. It’s call Metal Supermarket. They’re a franchise operation and there around the country. They had what I wanted – 16 ga. stainless steel. https://www.metalsupermarkets.com/
Now to figure out a bending method. I’m considering something similar to what Jeff L. does with the long posts or what Mursell does with the winch.
Thanks, Herbert.
I will look into it.
bob
Let the good times roll. Another dynamic chair making session has begun! Curtis’ dynamic instruction and subtle wit, coupled with Elia’s fantastic tool skills, promise to make for hours of viewing pleasure and learning. But, first, I gotta go make a bending jig………I tried to post an image but the technology requires someone smarter than I am…..