This is a fairly comprehensive list of the chairmaking tools I use for building 18th Century chairs. You DO NOT need to bring all these tools to class. I have all the tools needed if you are attending a class at my shop. If the class is at a school, I’ll be bringing or shipping plenty of specialty tools like drawknives, spokeshaves, inshaves, drill bits, etc.
Bring whatever tools you have. Maybe you would like help getting some tools tuned up. Maybe you want to practice using your own tools (some tools, especially lathe tools, can feel very different with slight sharpening or manufacturing variations). Wait to buy tools till you get a chance to see what you like during the class.
Froe and Froe Club — If you must buy new I’d buy Lie-Nielsen’s or Lee-Valley’s but I like my old ones better. A 4″ diameter club seems about right.
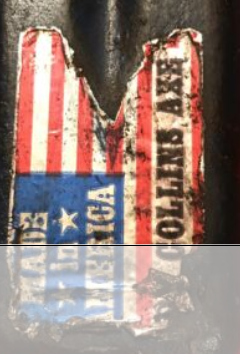
Splitting Wedges: New wedges all seem to have big bevels at the edge that make it hard to start a split. A blacksmith can draw them to a point, or you can buy good ones used on Ebay. Just make sure the taper of the wedge continues all the way to the point, without any secondary bevels. I have a vintage USA-made Collins wedge that works nicely. It has a label like this and they can often be found on Ebay. The new ones made in Mexico may be good too, I don’t know.
Hewing Hatchet – Can be single or double beveled – two or three pounds is about right.
Drawknife — Barr Tools and Lie-Nielsen make nice ones, but I like old ones from Ebay. None of the new ones has a thin enough blade to allow the drawknife to fit into tight curves such as the seat’s waist. For that, it’s nice to have a blade that’s 3/16″ thick or so at the edge. My online class has lots of sharpening, purchasing and using info. Good old brands are too numerous to name: PS&W, Lakeshore, Witherby, Barton, etc.
Spokeshave — 18th Century spokeshaves were wooden bodied; they are superior for endgrain and little else. In my day-to-day work, I use metal spokeshaves like Stanley #151 and the curved-bottom Boggs Shave from Lie-Neilsen (no need for the flat-bottom – the curved bottom will work for everything).
Marking Gauge — The duller the better – a sharp one won’t leave a line on green wood. I buy used ones on Ebay.
Hammer and Wooden Mallet
Holdfasts – One will do many things, two will do it all.
Try square — For the reaming operation, make sure it will stand upright; some tip over if the wood is worn.
T-Bevel — Get one that locks well, like a Stanley #18. The Japan knock-offs I’ve seen are junk, as are the plastic things at Home Depot.
Bevel Board — Handy for setting the T-Bevel. Highland Hardware has a nice cheap one. You can also make one yourself or use a large protractor.
Awl – The 18th C. pencil.
Ruler
Backsaw — For cutting off tenons and the like.
Bench Chisel — A 5/8″ chisel is needed for the loop mortises in the seat. The worse it looks, the better I like it.
Gouges — Swiss Made is a nice brand. For carving the seat , print this photo of my gouges and find one that’s close to the third from the top. Anything that has a similar curve will work; at least 3/4″ wide is good. (The period chair that our seat is based on was carved with a gouge instead of an inshave, but you can use either one). You can also use this gouge for trimming leg tenons, but something beefy and of moderate sweep like a #3 is better. For gutters, use a veiner — I use an 11/7.
Brace & Spoon Bits — We’ll use 3/8, 1/2, 5/8″ spoon bits (the two bigger sizes are approximate to within 1/16″ +/-). Gramercy spoon bits are by far the best being made. Antique spoon bits are rare as hens teeth. Read more info on my bit choices. My online class about drill bits has info on choosing, sharpening and using auger bits.
Jack Plane, Smoothing Plane — For smoothing the seat and bow.
Sharpening stones and slips — I have some in my shop you are welcome to use. Schools sometimes have them.
Dividers — I like old ones, such as the ones made by ps & w.
Card Scraper — Learn to sharpen them here.
Travisher — Get one from me, Claire Minahan or James Mursell, or make your own. I’ve never seen a good used one for sale.
Turning saw — The 18th century version of a bandsaw. You want a big one, 28″ or so. God knows where you get the blades – maybe refiling a 3/8″ 6-8tpi bandsaw blade so it the teeth have zero rake would work.
Pencils — Schools often don’t have enough pencils, amazingly enough.
Notepad, Camera — A camera is great way to take notes.
Safety Glasses — Imperative when using metal wedges and a metal sledge hammer. I have plenty of glasses in my shop, but yours may fit you better.
Reamer — Six to eight degrees is about right. 18th Century reamers were blacksmith-made – they are sometimes available from antique dealers or on Ebay. Otherwise, you can make modern ones (information at greenwoodworking.org or my videos), or buy one from me or Tim Manney.; they are slower, but allow more control.
Stretcher Tenons – In my shop, I prefer using a skew chisel or a turner’s gate for turning tenons (it makes it easy to remove the shoulders and the tenons are always aligned with the stretcher’s axis). My second favorite method is a dowel plate, which is cheap and low-tech.
Turning tools —For the pole lathe, we’ll use a broad chisel, a skew chisel and a roughing gouge. The broad chisel can be skewed or (better yet) square nosed; anything over 1″ is good – 2″ is better. If it’s skewed, it cuts slower (or more awkwardly), but you only need one chisel. If you use a square nosed chisel, you’ll also need a skew for cutting vee-grooves: anything over 1/2″ is good. The gouge can be shaped like a spindle or a roughing gouge – anything over 3/4″ is good.
8 to 12″ Half-Round File for cleaning up seats.
Finishing:
Oil Paint Artist’s oils are close to period paints; they need to be diluted slightly with turps. Milk Paint was unheard of on period Windsor chairs, despite the modern hype. The color of choice for 18th Century Windsors was verdigris, a bright green pigment that often darkened drastically with age. Golden brand acrylic “Chromium oxide green” is a good approximation of period verdigris paints.
Instructions for making some of the bigger tools:
A nice shaving horse: Tim Manney has designed a simple shaving horse that works really well.
Free Workbench Plans: Curtis has free plans for his workbenches, which are similar to mine (mine are a little bigger and disassemble easily).
Kiln: I have some blog posts about making a kiln.
Steam Box: My blog has a series of posts about steam boxes.
Pole lathe: There’s lots of info on YouTube and online – just make sure you’re making a lathe that fits your body (the centers should be at elbow height) and is for spindle turning (the tool rest and treadle are quite different for bowl lathes). Mike Abbott’s book Green Woodwork has lots of good info.
Favorite books from my library:
The Chairmaker’s Notebook by Peter Galbert is the most comprehensive book on Windsor chairmaking in print.
Understanding Wood by Bruce Hoadley is an indispensable reference about why wood behaves as it does. Read chapters one, two and four if you read nothing else on chairmaking.
Turning Wood with Richard Raffan is a good general woodturning book for both spindle and faceplate work. Info on the skew is rather thin.
Understanding Wood Finishing by Bob Flexner demystifies the various kinds of finishes. He puts more faith in thick glossy finishes than I do, but the info is excellent.
The Perfect Edge by Ron Hock is an excellent book on sharpening. However, getting a usable edge is an easier task than the myriad lengthy books on the subject would have you think.
Nancy Goyne Evans has three excellent books on the history of American Windsors and Windsor chairmaking.
The Nature and Art of Workmanship by David Pye is a brilliant book of craft philosophy. Why does a glossy finish on a rough board look bad? What is the difference between hand and machine work? This book tackles many such questions in a logical manner.
Roy Underhill’s TV show and first three books were what got me interested in this crazy profession. An antidote to all the technical books in the world, Roy’s black-and-white photos and whimsical writing are like a window into another time.
“>