I got a bunch of questions about using spoon bits. Here’s the answers to a few of them.
How do you get the spoon bit to start where you want it?
My favorite answer is to adjust your expectations. But there are some tips that will give you more control. I’ve never used the first two much, since I mostly use spoon bits in historical settings where accuracy is less important.
- Make a hole with an awl or small drill bit first (the bigger the better). The spoon bit will tend to stay centered around the awl hole
- Wallow out a spot with a gouge first.
- Place the bit about 1/4 of the bit’s radius away from the hole. Crank the brace a half turn clockwise, then a half turn counter-clockwise, back and forth until the bit has cut a depression the diameter of the bit. Proceed to drill normally. This will work, more or less.
- If any of the above fail, tilt the brace over at a 45 degree angle, pointing in the direction you need to move the hole. Crank the brace forwards until you like where the hole is. It’s best to do this correcting before the bit has started cutting at it’s full diameter.
You can watch technique number 3 in this video Peter Follansbee sent me from Guadix, a town in Spain where around 10,000 people live in caves (this from Curtis Buchanan, who visited there in the 90’s). The spoon bits start at the 15-minute mark (don’t blink, you’ll miss it):
How do you prevent tear out?
Tear-out at the hole’s mouth is mostly caused by a dull bit. In general, the harder the wood, the less tear-out you’ll get. It may never cut the entry as cleanly as a good auger bit, but it can come close.
On the exit side of the hole, tear-out can be minimized by take all pressure off the bit when you start to feel the bit going through. You can even lift up a little on the brace so the bit is taking very fine shavings.
How do you get a Clico bit to work?
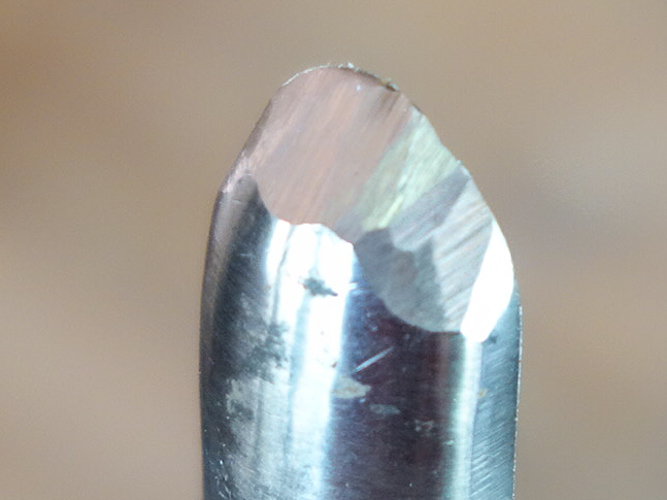
Clico bit that I ground to make it more aggressive
Mass-produced for decades, Clico bits cut very slowly because they have little forward cutting angle down the hole. If the bit can’t remove wood from the bottom of the hole, what kind of bit is it? I’ve quickly ground some of mine on a grinder which improves things greatly. I’ve done this to one of my Emhoff bits as well, with good results. A 35 degree angle is about right (measure this angle the same way you’d measure the bevel of a chisel). It doesn’t take much grinding.