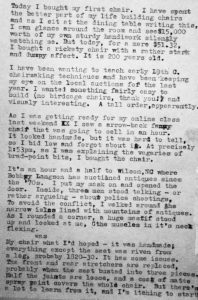
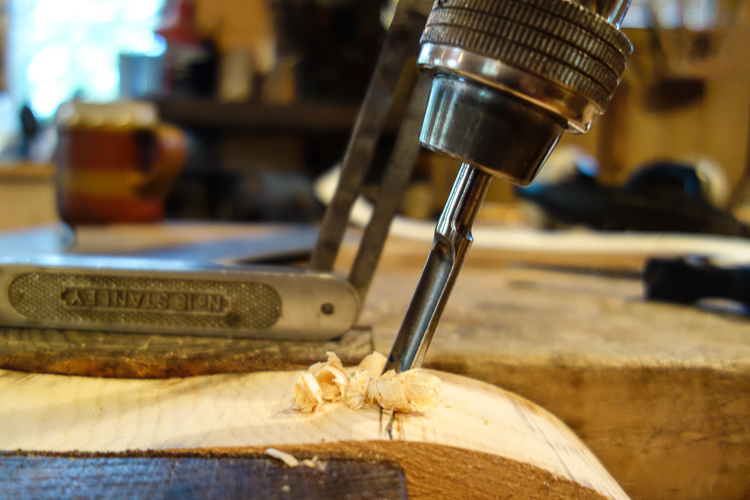
My First Chair
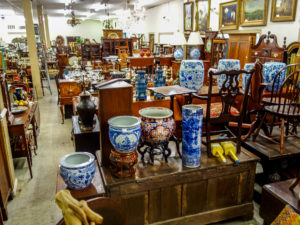
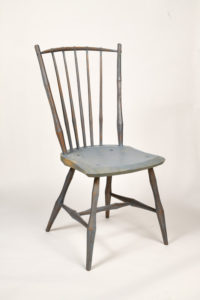
Lots of Antiques!
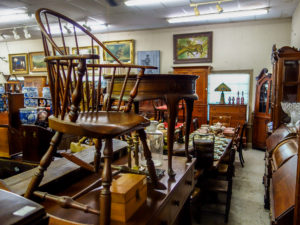
An 18th Century Sack Back
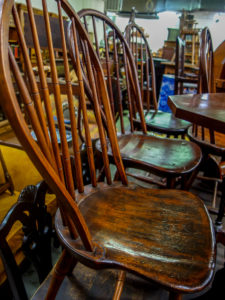
A whole set of loop backs, probably early 19th century. The bows are incredibly thin on these chairs – it’s amazing any of them survived this long.
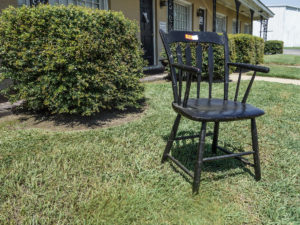
My pride and joy. It’s pretty comfortable, despite it’s fairly flat seat and round arms.
GreenBook: A Book List for Green Woodworkers

Bob Simmons put together this spreadsheet of Green Woodworking books. Feel free to add your favorite books and edit however you see fit – this is truly a communal book list, by you for you. Happy reading!
A Urn and Democratic Class Schedule
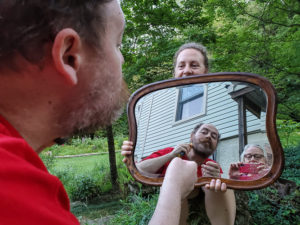
It’s been a busy month for us. My wife’s brother Gabe, who has been fighting cancer for nearly two years, took a turn in mid-September. So we’ve been driving to Berea, KY every couple weeks to visit and help take care of him. He died nine days ago. Here’s a photo of him last summer shaving his beard as my wife Morgan holds the mirror and mama Rita takes the photo:
When Gabe asked me to make his urn, I showed him Follansbee boxes and dovetailed boxes, but Gabe wanted something I knew I couldn’t make by myself: a mitered walnut box with maple splines. Think of the precision required! Yikes!
Kelly Mehler has been a friend of the family since before Gabe was born. I shipped chair parts to his school back when Curtis Buchanan was teaching there, but I had only met him once. Last weekend, I spent three afternoons with him in his shop building Gabe’s urn together. Morgan just walked into the shop and took a picture of it:
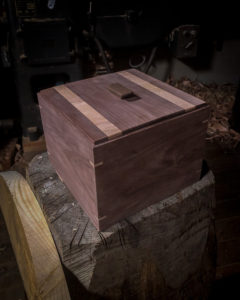
I think it’s the most precise thing I’ve ever made in my live. It’s sitting on my hewing stump that I pulled out this afternoon, getting ready for Saturday’s Democratic class with Curtis. Speaking of which, my schedule has firmed up so I booked a few more classes today:
WHITTLING SPINDLES AND BENDING THE CREST October 24th, 2-4pm Eastern
After whittling the spindles and crest, we’ll bend the crest and talk about drying the parts. We may get into choosing and flattening the seat as time permits. Plus Q+A session
PLANING THE SEAT, BORING AND REAMING MORTICES October 31st, 2-4pm Eastern
While our green parts dry, we’ll planing the seat and then bore boles for the legs and posts and start reaming the holes to fit. Plus Q+A session
CARVING THE SEAT Nov. 14th, 2-4pm Eastern
We’ll saw out the front of the seat with a bowsaw, then spend some time learning to use the inshave and start start carving the seat. Plus Q+A session
BEVELING THE SEAT Nov. 21st, 2-4pm Eastern
We’ll finish carving the top of the seat and start beveling the sides and underside of the seat with a drawknife. Plus Q+A session
The subject matter for each class is a guess – we’ll fit in as much as we can each class and keep going till we’re done. You can find more info and register for the classes (on a donation basis) on my website.
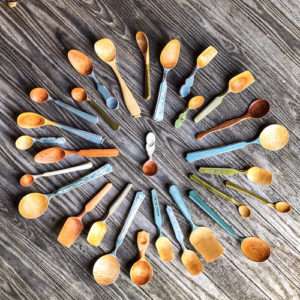
Spoon Carving Videos with Curtis Buchanan
Last weekend’s spoon carving class with Curtis was a blast. It was great to be able to teach with him and I learned a new way to carve a spoon. We’re busy figuring out how to get Curtis’s camera into his shop and buying lights for my shop before our Democratic Chair class series starts next month (get your order for parts in by Sunday). Here’s some clips from the class (the full video is available for donation on my website):
Steam Bending a Spoon Blank
Using a Drawknife to Carve a Spoon
A Hollow-Grinding Jig for Sloyd Knives
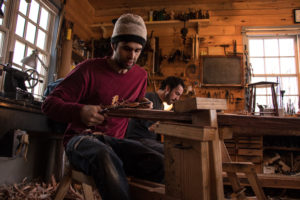
Democratic Chair (and Spoons) with Curtis Buchanan
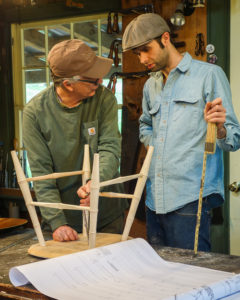 I’m super excited! I started an apprenticeship with Curtis Buchanan 18 years ago and I’ve been teaching chairmaking myself for 15 years, but we have never taught together – until now. We’re going to teach a series of 10-15 online classes on building Curtis’s Democratic chair and to start things off we’re going to do a spoon carving class.
We’re trying a new payment system this time. All classes are still paid for individually and cost $40 each, but if you can’t afford that you can donate whatever you want (well, it has to be at least $1). We don’t want anyone to be kept out because of money. You can also donate extra to help cover someone else’s tuition.
If you want to build this chair along with us, Seth and I are offering free shipping on a set of Democratic rivings and seat blank (the first time I’ve ever sold seats). I’m also adding some one-on-one zoom classes in between the large classes in case you need extra help.
Visit the online classes page for more info and to register.
SPOON CARVING with CURTIS BUCHANAN & ELIA BIZZARRI
September 19th, 2-4pm
First we’ll whittle a blank, then boil it in a pot, bend it, then carve a serving spoon. We’ll talk about materials and tools as we go and we’ll laugh a lot.
DEMOCRATIC CHAIR SERIES with CURTIS BUCHANAN & ELIA BIZZARRI
Curtis Buchanan designed this chair to be an easily accessible project – it requires fewer tools to build than most Windsor chairs and allows for a wider variety of woods. Curtis will join me as a co-teacher for all of these classes.
STRETCHERS, POSTS AND LEGS October 10th, 2-4pm
We’ll talk about wood selection and how to split the parts out, then whittle as many parts as we have time for. And we’ll answer all your questions.
WHITTLING SPINDLES AND BENDING THE CREST October 17th, 2-4pm
After whittling the spindles and crest, we’ll bend the crest and talk about drying the parts. We may get into choosing and flattening the seat as time permits. Plus Q+A session
More Democratic Chair classes at the end of October and in November.
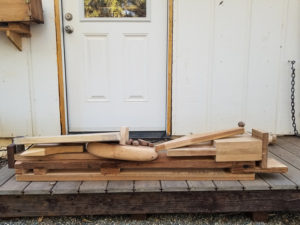
Knock-Down Shavehorse
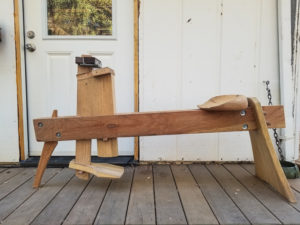
After seeing Bob Simmons space-saving shaving horse ideas, Jason Gallagher send me photos of this modified Tim Manney horse that Jason made with his buddy Tommy. With a few wedged joints, it knocks down nicely into a small bundle of parts. In his words:
Its Tim’s shave horse with a couple mods. The front leg is secured by two pieces of angle wood glued to the main runners and reinforced with 1/4″ bolts. Once glued up as a unit, it creates an angled mortise or pocket for the leg; which, is basically just a long wedge. I added bolts because the pieces that make up that mortise are small and dont have a ton of gluing surface. It would probably be fine but I didn’t want the thing to collapse on me in the middle of demo-ing at a fair (not exactly confidence inspiring for people watching me make a chair…hehehe). The rear leg is held on by a double tusk tenon and I think I’ll make the rear leg a bit wider…..one day (more stability). The “head stock” and foot rest are held on with the usual tusk tenons as well. It’s made from scraps and 2×6 doug fir lumber. As for the for the seat, it needs some “adjusting”…one day.
Drill Bits online class/Greenwood Videos
DRILL BITS: POSITIVE TOOLS FOR MAKING NEGATIVE SPACES
Buying (what to look for in old drill bits and new ones)
Choosing the right bit for the job
Sharpening Augers, Spoon Bits, Center Bits, etc.
Making Bradpoints from Twist Bits
Q&A Session
Saturday, August 29th, 1-3pm Eastern Time
You can make a donation to register on my online classes page.
The recording of last weekend’s Greenwood class is available by donation for folks who missed the live event. Go to the online classes page. Here are a few clips from the recording:
How to Control a Split with a Froe, Riving Break options, Species for Riving:
Choosing Metal Splitting Wedges that Work:
Attaching Froe Handles, Blacksmith and Mass-Produces Froes:
All about Green Wood: Online Class #2
 Since my drawknife class last weekend, I have been running around buying new cameras, stand, cables and a wireless mic. I feel like it’s Christmas every time the mail lady comes. I found a new videographer (Roy Underhill is a little busy), and am working on ways to speed up my internet. I’m excited to put it all to use next weekend!
I’m going to try a slightly different format for this second class. I’ll do a demonstration for the first 75 minutes or so, then we’ll have Q&A immediately following the demonstration. Let me know what you think!
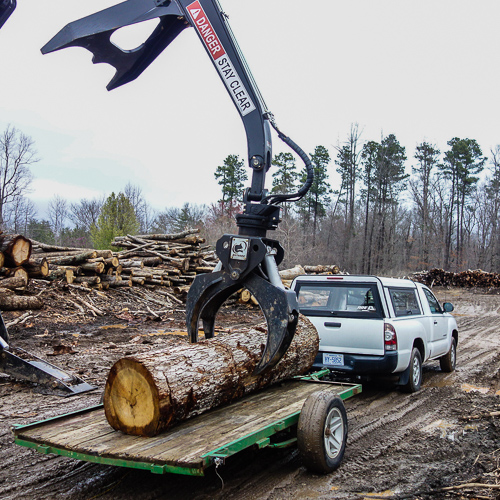
GREEN WOOD
Buying (what to look for in a log)
Where to find Green Wood
Riving
Tools (how to buy froes and wedges that work)
Work Holding (breaks and other devices)
Can dry wood be made green again?
Myriad other bits of rare and priceless information
Saturday, August 15th, 1-3pm EST
Donations worked so well last time that I’m going to try it again for this class. Visit my online classes page to make a donation and register.
Space-Saving Shavehorses
My first online class about drawknives was quite a success last weekend. Fifty-eight people registered for the class and Roy Underhill showed up with lots of equipment and proceeded to film the entire class for me. We had lots of good questions.
One question that came up was working wood without a shave horse. Shave horses do take up a lot of real estate in the shop. I hang my collection in an out door shed:
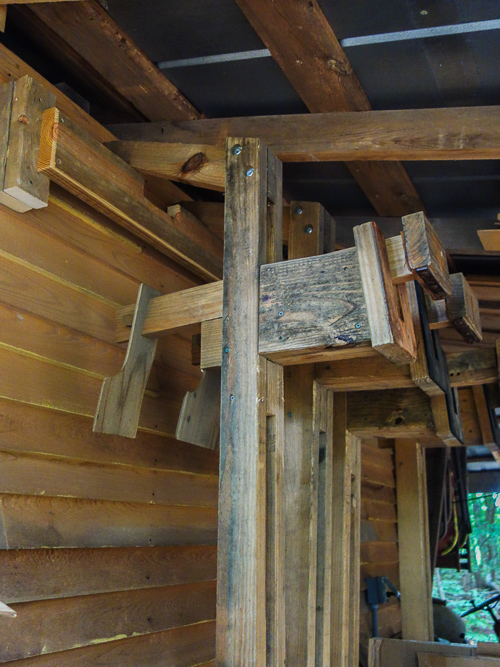
The horses hang from this little dowel in the front leg of the horse. There’s also a neat idea for a knock-down shavehorse.
Bob Simmons, who has taken three classes from me, sent these ideas for compact shave horses: In his words:
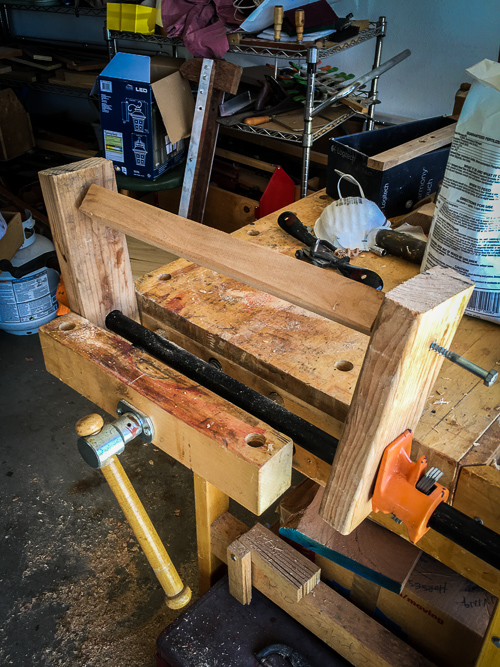
Some woodworkers want to shave with drawknife or spokeshave but have difficulty committing to a shaving horse to hold the work. The issue is usually floor space for storage. This simple pipe clamp, wooden block, lag screw device holds stock at convenient height for shaving while standing and allows the stock to be rotated. It does not work well when shaping chair spindles which are flexible since this device uses compressive forces and the spindles tend to buckle.
read more…
Drawknives: My first Online Class
In the last three weeks, I have learned more about USB ports, bitrates and internet hotpsots than any chairmaker should ever know. Having tested everything to the best of my abilities, I am now ready to run my first class, this Saturday, August 1st, 1-3pm, with a follow-up Q&A session Sunday August 2nd, 3:30-5pm. Hopefully everyone will go into their shop after the first class, try what they’ve learned and then ask any follow up questions on Sunday.
Topics include:
Buying drawknives (what to look for: straight vs. curved, bevel up vs. bevel down, new vs. old…)
Sharpening (what angle to use, how to grind, how to hone, tightening handles, etc.)
Work Holding (shave horses, bench gizmos…)
Use (various projects, flattening a board, making round objects, )
Reading grain direction
Myriad other bits of rare and priceless information
This first class is available on a donation basis – spread the word!
For more info and to register, visit my Online Classes webpage.
SPINDLE WINNER
The winner of the spindle giveaway was Mark Nicholson, who’s guess was a mere one ounce less than the correct weight of 2# 8oz. Congratulations!